Follow me

Follow Me on Pinterest

Monday, February 4, 2013

Ham & Cheese Stuffed Pretzels with Chick-fil-a Sauce

Now that I am finally calming down from our Super Bowl win, I can post about the delicious snack I made for the game.  We have been waiting for this moment for a long time, so I decided to make something that I’ve been dreaming up for a long time….ham and cheese stuffed soft pretzels! YUM!

I have never made soft pretzels before, but I really wanted to give it a try, and boy am I glad I did!  It was fun and now that I’ve had some practice I have many more ideas of how to customize them!  But for now, I’ll share how I made these.

First off, I had to find a recipe, because like I said, I’ve never made these before.  So I used a recipe from here. It is identical to most soft pretzel recipes I found on other websites, but the directions were simple to follow.

This recipe called for:

  • 1/2 cup light brown sugar
  • water
  • 2 (1/4 ounce) packages active dry yeast
  • 1/4 cup vegetable oil
  • 5 3/4 cups flour
  • 1/4-1/2 cup flour, for kneading
  • 3/4 cup baking soda
  • 1 large egg, beaten with 1 tablespoon water
  • coarse salt or flaky salt, for sprinkling (I used sea salt) 
You can follow the directions on the website, but here are some pictures to show you how things looked throughout the process.


The water & brown sugar mixture with the yeast foaming on top.
After adding the flour, you need to knead the dough. Haha!
Then, put the dough into a large bowl, cover it with plastic wrap, and let it rise for 45 minutes.
Roll out the dough and cut it into 24 sections.  I used a pizza cutter to do this.
Roll the dough into 1/2" x 9" sticks.  The recipe called for putting them on parchment paper, but I didn't have that so I used foil and they were fine.
Then you have to give the pretzels a 30 second bath in a hot water/baking soda mixture.  The pretzels are then dried on a paper towel, put back on the cookie tray and painted with the egg mixture.  Finally, bake them for 10 minutes or less at 450 degrees.

Once the pretzels were finished baking I sliced them like you would a sub roll and stuffed them with ham and Swiss cheese (my fiancé chose pepper jack for his).  I put them back in the oven at 350 degrees for just long enough for the cheese to melt and then served them warm.  Oh my God, they were delicious!


Here it is all done with the Swiss cheese and mock Chick-fil-a sauce.
This is my fiancé's version, with the pepper jack.

Finally, I made the mock Chick-fil-a sauce, which I am now addicted to.  I should have never made this stuff, because its tastes just like the real thing!

To make the sauce mix the following ingredients together:
  •      1/2 cup mayo
  •       2 tbsp. mustard (regular prepared yellow mustard)
  •       1/2 tsp. garlic powder
  •       1 tbsp. vinegar
  •       2 tbsp. honey
  •       Salt and pepper, to taste


If you are using this in combination with the pretzels, then you definitely want to double, maybe even triple, the recipe!


Go enjoy! 


Monday, January 28, 2013

EASY Wedding Budget Spreadsheet

For any guy or gal planning their own wedding, you know that the problem you run into again and again is money!  No matter how much of it you have, you still need a budget.  

Step one of planning a wedding is setting your budget, which can be difficult.  I am sure if you're reading this you already know that you need to find out if your families are helping you first.  If they are, then great!  If not, then you are not alone!  Either way, you need a way to manage your money during this stressful time.

In the beginnings of our wedding planning I created a simple spreadsheet to manage our money.  Okay, I'm not going to lie-what I call 'simple' now would not have been 'simple' to me a couple of months ago.  I was lucky to have taken a grad class last year that taught me a lot about Excel (good timing!).  Anyway, even if you are not good with Excel, it's okay, because all you have to do is plug in numbers to this spreadsheet and it will do all of the adding and subtracting for you!

Click here to download the blank spreadsheet! 


As you can see from this screenshot, you may want to reformat or rename somethings...and you should!  Everyone's budget/wedding is different!  If you have any questions or need any help, feel free to comment below!

Monday, January 21, 2013

Beef and Potato Empanadas

I made these for the first time last spring after craving Julia's Empanadas in D.C.  They are nowhere close to Julia's, but they're still delicious.  I think I will try making them with chorizo in the future to give them a taste closer to Julia's.  Anyway, this is an easy dinner and something different that your family is sure to love.


Ingredients:
  • 2 Peeled and chopped potatoes 
  • 1 Chopped onion
  • Olive oil
  • 1 lb ground beef
  • 10 oz can of tomato paste
  • Garlic to taste
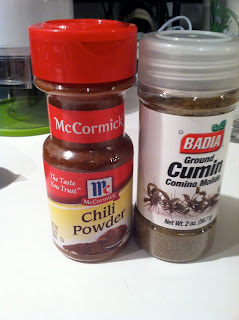
  • 1/2 tsp chili powder
  • 1/4 tsp salt
  • Cumin to taste (I just lightly sprinkled it)
  • Shredded cheddar cheese or Mexican cheese
  • Pie crusts
  • 2 eggs
Step 1: Sauté the potatoes and onions in the olive oil until the potatoes are slightly tender, they'll cook up more in step 2.


Step 2: Add the ground beef and cook until browned.

Step 3: Add in the can of tomato paste and all of your spices.  Let it simmer for about 20 minutes. 


Step 4: Lay out your pie crusts on a cookie sheet and place the meat and cheese on it like shown below.  You can cut your pie crusts in half to make smaller empanadas, my fiancé just likes them macho sized!


Step 5: Use a fork to pinch the ends together.

Step 6: Beat the eggs together and paint them onto the pie crust.  This will give it a shiny, crusty finish.


Step 7: Bake at 400 for 20 minutes and enjoy!


Thursday, January 3, 2013

Chicken Delight Casserole

This is seriously one of the easiest and most delicious dinners ever.  I just found the recipe in November and have made it four times already!  I never have leftovers either!  My dad, who is the pickiest eater I have ever met, coined the term Chicken Delight.  Let me know if you like it.

Ingredients:

  • One rotisserie chicken
  • 1 box of Chicken flavored Rice A Roni
  • 1 container of French Fried Onions
  • 1 can of cream of mushroom soup
  • 1 container of sour cream (8 oz.)
  • 1 to 2 cans of string beans


The sour cream is not pictured here or the string beans...but I did remember the wine!

Directions:

Step 1: Cook the Rice A Roni according to the directions on the box.


Step 2: While the rice is simmering, pull apart the rotisserie chicken.


Step 3: Mix together the Rice A Roni, cream of mushroom soup, and sour cream.

Step 4: Mix in the chicken and lay it out in a sprayed baking dish.  I used a 13 x 9” baking dish, but the size doesn’t matter too much.  If you use a smaller dish, the casserole will just be thicker.

Step 5: Bake at 350 for 40 minutes.  Take out the casserole and add the container of French fried onions to the top and bake it for an additional 5 minutes.

My fiancé dug into this before I could get a completed picture!  Go figure!


I think next time I'm going to add the string beans into the casserole rather than having them as a side because we always mix them in with it anyway.  Give it a try!

Enjoy!