Follow me

Follow Me on Pinterest

Monday, November 26, 2012

Puppy Art: Thank You Cards!

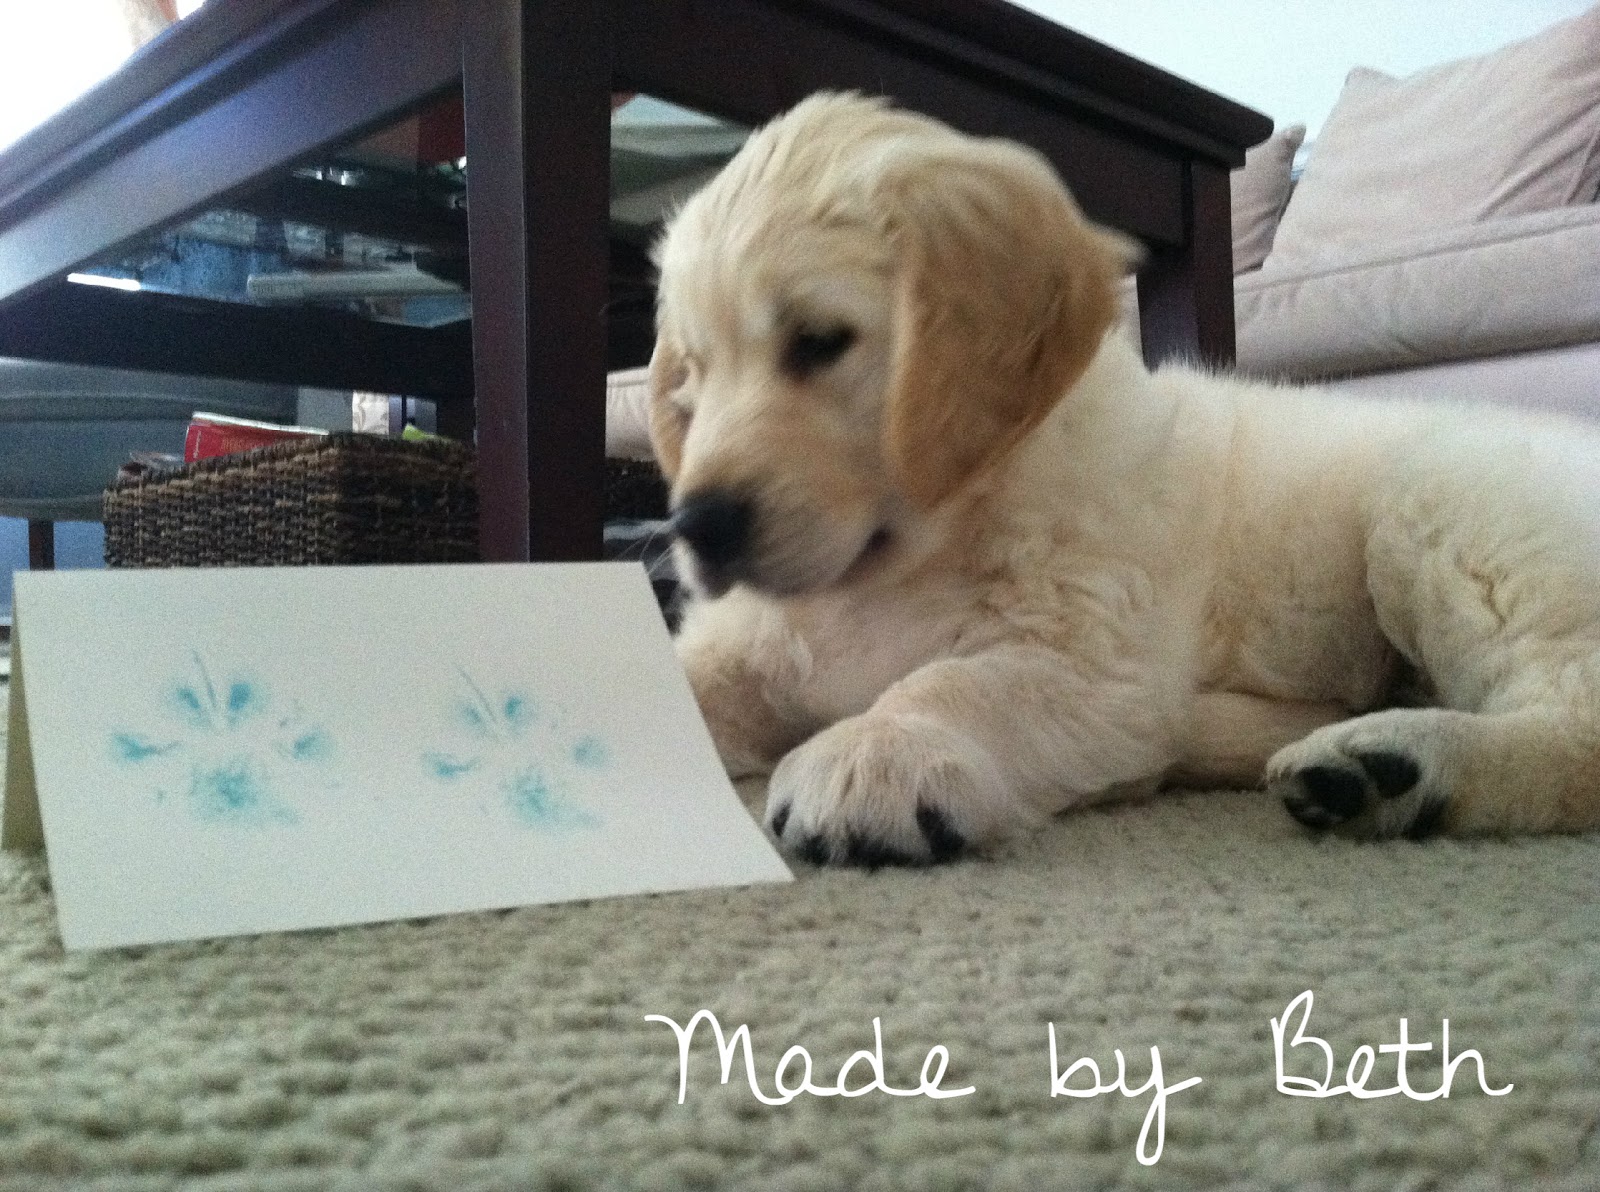
This craft project comes from 8 months ago when my Golden was still just just a baby!  

Anyways...once we brought Rooney home, so many people stopped by to bring him toys, so we decided to thank them with homemade thank you cards.

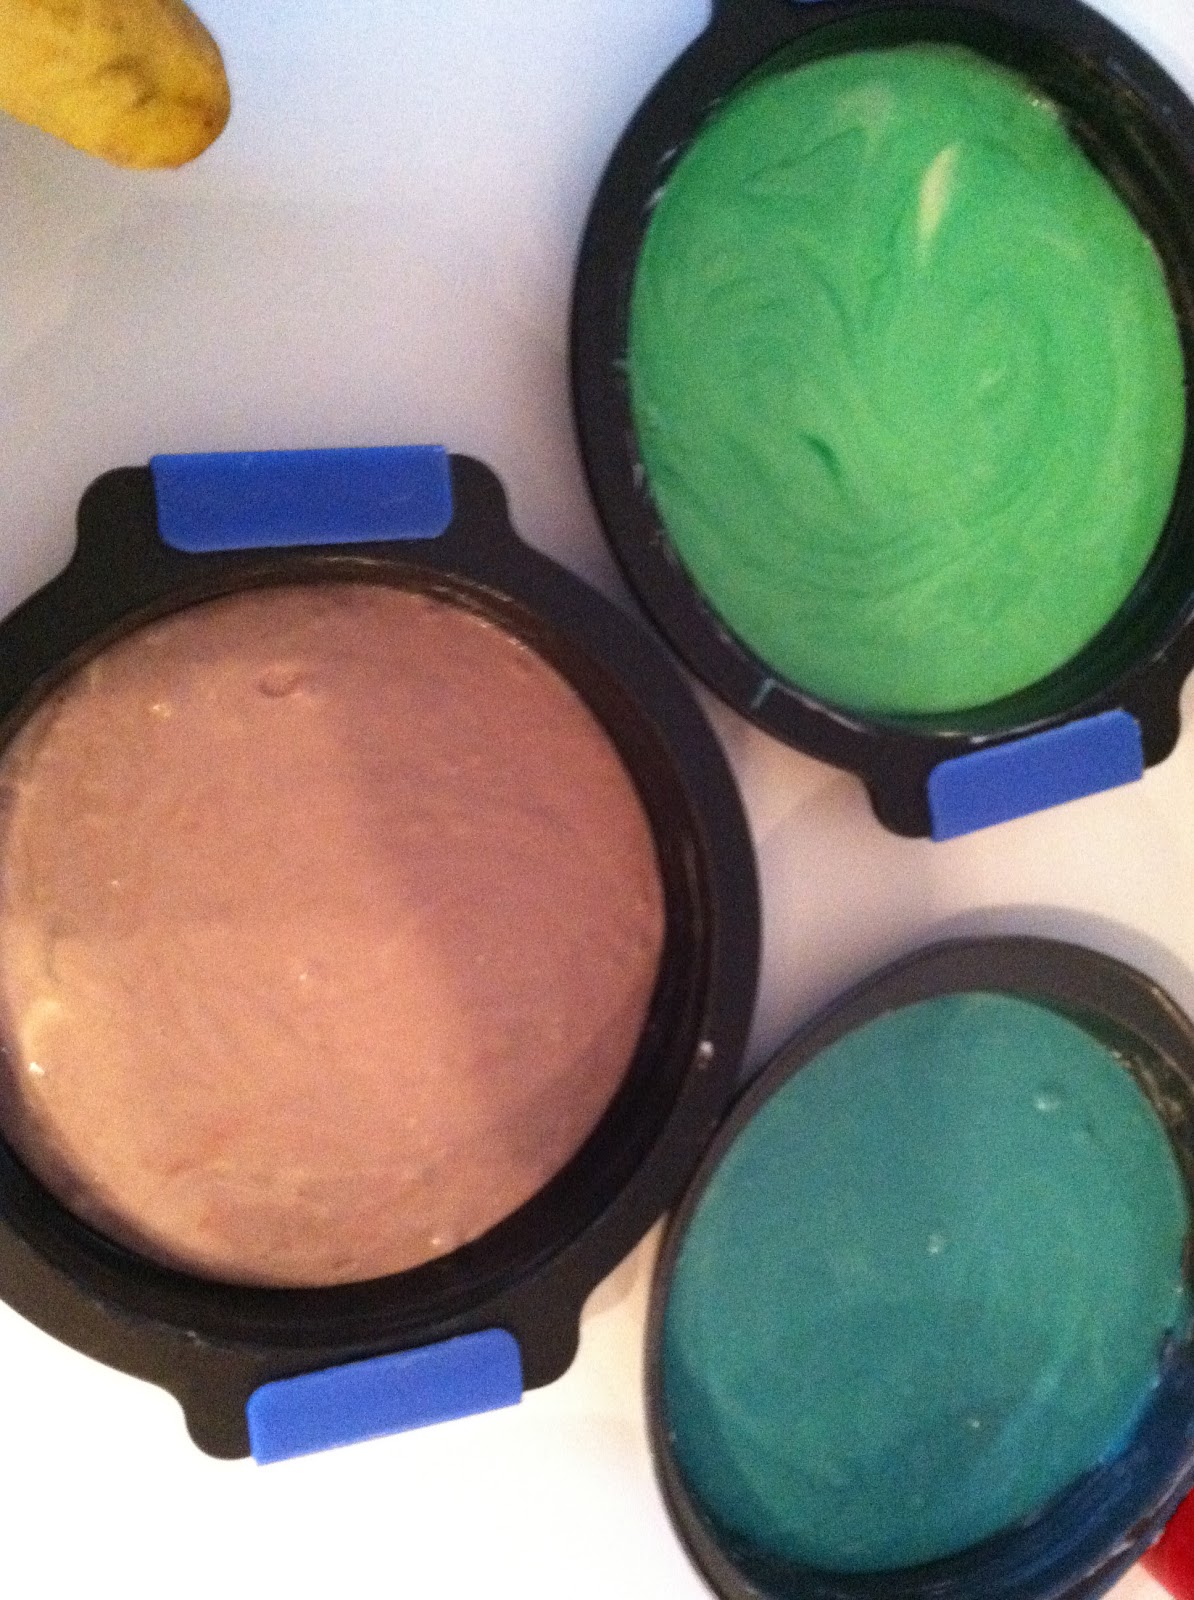
First, I must say that I did a lot of online research to find out the safest type of paint to use.  I went with watercolors, which were made for kids and marked non-toxic.  

Next, I mixed together blue and green watercolors to get the color I wanted and then really diluted it with water.

Then, very carefully I put Rooney's paw into the watercolor and then stamped it a couple of times onto the paper.  You can see in the picture below that I also made a mat for a picture frame with his little puppy prints on it.

Lastly, I wiped off his little paws and washed them with lukewarm water until the water was clear.


Here is the final product!  He was so proud of his art work!  Everyone loved their thank you's and I loved making this little memory with my golden boy!


Sunday, November 25, 2012

Green Bay Gift Basket

I love my Ravens, but I grew up in a Green Bay lovin' house!  So, for my Dad's birthday (way back in August), I made him this gift basket that any dad would love!  PBRs, a gift card to buffalo wings, cheese, and crackers.  Then I made this little plaque to go with it!  Just some fun kitsch! 

The plaque is just a piece of wood that I painted using acrylic paints.  You can easily layout fonts on wood by printing them on paper and tracing over them with a pen or pencil.  The tracing leaves an unnoticeable mark in the wood that you can use to pretty much color in with paint.  I wish I had more pictures to be more detailed, but I don't.  I'll be doing a similar project in the future and will show you with pictures how to transfer images onto wood.


I'm Back

After a long hiatus....I am back!  I will be digging through some backlogged projects to upload some new things in the next few days!

Also, look forward to some new Christmas and wedding projects!

Saturday, July 7, 2012

Will you be my bridesmaid?


WILL YOU BE MY BRIDESMAID?

Being a bride is a big deal, so why shouldn't being a bridesmaid too!?  I wanted my girls to feel special, so I handmade a little something to go along with the question...will you be my bridesmaid?  I think they liked it!  Hopefully you do, too!

A bag for each bridesmaid....


Inside...a folder with all the info they need and more!


How to make the bag:

You will need:

  • A canvas bag
  • 12" paper doilies 
  • Fabric paint (I used navy blue)
  • Multi-purpose spray adhesive
  • Exacto Knife


Step 1:  Use the spray adhesive to temporarily glue your doily onto the canvas bag.  I forgot to take pictures during this process, but it's pretty simple.  I placed my doily in the lower right hand corner.  Once the doily is secured, use your fabric paint to paint between the wholes in the lace section of the doily.  Once finished paining, lift the doily off of the canvas.  If it rips, it's okay, just gently pull any remaining pieces off. 


Step 2: I went on my computer, found a font I liked and printed initials for each of my bridesmaids.  You can size it yourself.  After you print your letters, use an exacto knife to cut them out and create a stencil.  Again, use the spray adhesive to temporarily glue your stencil to the canvas bag. 


Step 3: Use the fabric paint to fill in your stencil and then gently lift it off of the canvas.  Once dry, your bag is done!  You can stop here...or add the folder too!


How to make the folder & its contents:


You will need:

  • A folder in your wedding color
  • Some scrapbook paper of your choice
  • Edge print die cut (your choice)
  • A printer
  • Paint swatches in your wedding colors
  • Glue
  • Paper clips
  • Blank Cards

Step 1: Print your initials and wedding date on scrapbook paper of your choice.  Use a edge print die cut to create a lace effect on the scrapbook paper and glue it to the front of your folder (I used the spray adhesive from the bags to ensure it stayed).


Step 2: Create the contents of your folder.  Pictured below is what I included in my folder, but  BE CREATIVE! Do what suits your bridal party!   

"your dresses"
Info about their dresses with paint swatches attatched

"your role"
A little write up about the role of the bridesmaids
"what we're working with"
I included funny pictures of all the groomsmen


 I included a personalized letter to each bridesmaid


Step 3: A large portion of my folder was the 'my girls' section.   I described each girl and wrote a 'most likely to...' for each bridesmaid.  I left out a picture for privacy.  


Step 4: Fill your folder with your creations.  I added a quote into the folder, "Friendship isn't a big thing...it's a million little things." -Anonymous 


Step 5: Put your folder in the canvas bag, make a cute little tag (I attached mine with twine) and present it to your bridesmaids.  I gave my girls their bags at my engagement party!  


Monday, May 28, 2012

Rainbow Cake!

Well, this is a very long over due post.  I have many things ready to go up on here, but with an engagement and a puppy, I have seemed to have lost time.


So...without further ado...here are directions on how to make this delicious and beautiful rainbow cake!


Ingredients for the Rainbow Cake:

  • Double yellow cake recipe
  • Food dye
  • Vanilla Buttercream icing
  • Chocolate Buttercream icing


Step 1: Using your own yellow cake recipe (or a boxed one) mix up two batches of cake mix.


Step 2: Divide the cake mix into six separate bowls, one for each different color/layer or the cake.


Step 3: Add food coloring to each bowl for whatever colors you would like to use.  Follow the directions on the dye box in order to create the proper colors.  Once you add the dye, stir until you have your desired color.


Step 5: After your cake cools, layer your colors.  I forgot to take pictures during this process.  But basically, you will lay each layer and icing in between.  I chose to use chocolate and vanilla buttercream icing, but looking back I think sticking to white would have made a nicer final product.  

Step 6:  This is the hardest step...waiting to slice the cake!  You never truly know how your rainbow cake turns out until you slice into it!


Monday, March 12, 2012

Mexican Lasagna ~ Inspired by Colleen

An extremely easy and lip smacking dish for Mexican food lovers!

This is one of my favorite dinners!


This picture (and the others) do not do it justice!

Ingredients:

  • Ortega Taco Sauce
  • Tortilla Shells
  • Ground Beef
  • Taco Seasoning
  • Corn
  • Mexican Cheese
  • Refried Beans
  • Shredded Lettuce
  • Sour Cream


Step 1: Brown a little over a pound of ground beef and add in taco seasoning as directed.


Step 2: Cover the bottom of your casserole dish with Ortega Taco Sauce. 


Step 3: Place one tortilla shell in the bottom of the pan and cover it with refried beans.


 Step 4: Add a layer of canned corn.


Step 5:  Add the ground beef and cover it with a layer of Mexican cheese.


Step 6: Repeat steps 2-5.

Step 7: Top off your casserole with one last tortilla covered in sauce and cheese.


Step 8: Bake at 350 degrees for about 30 minutes or until the cheese on top melts.


Step 9: Slice it like a normal lasagna...it will be messy.


Step 10:  Top off with shredded lettuce, sour cream, and any other toppings you like and eat up!

Sunday, February 12, 2012

Buffalo Chicken Melts

A delicious dinner that cooks while you're at work!


Ingredients:
  • Chicken 
  • Franks RedHot Buffalo Wing Sauce
  • A pack of Hidden Valley Dry Ranch Mix
  • Water
  • Cheddar Cheese
  • Bleu Cheese Crumbles
  • Bleu Cheese Dressing
  • Bread
  • Butter
Steps:

1. Cover the bottom of your Crock-Pot with a little bit of water.  Add your chicken and cover your chicken with the Franks RedHot Buffalo Wing Sauce and the pack of Hidden Valley Dry Ranch Mix.  Then, mix these things together in the Crock-Pot, set your time, and go to work!

2.  When you get home, your chicken should be done!  Use two forks to pull apart the chicken so that it is shredded.

3.  Cover two slices of bread with butter.  Then place the chicken on one slice, some bleu cheese crumbles, and sprinkle on some cheddar cheese.  Put your melt in the oven.  Bake the melts just until the cheese starts to melt and the bread toasts a little bit.


4.  Once out of the over, put on some blue cheese dressing and top off your sandwich!


5. Demolish!