Follow me

Follow Me on Pinterest

Monday, March 12, 2012

Mexican Lasagna ~ Inspired by Colleen

An extremely easy and lip smacking dish for Mexican food lovers!

This is one of my favorite dinners!


This picture (and the others) do not do it justice!

Ingredients:

  • Ortega Taco Sauce
  • Tortilla Shells
  • Ground Beef
  • Taco Seasoning
  • Corn
  • Mexican Cheese
  • Refried Beans
  • Shredded Lettuce
  • Sour Cream


Step 1: Brown a little over a pound of ground beef and add in taco seasoning as directed.


Step 2: Cover the bottom of your casserole dish with Ortega Taco Sauce. 


Step 3: Place one tortilla shell in the bottom of the pan and cover it with refried beans.


 Step 4: Add a layer of canned corn.


Step 5:  Add the ground beef and cover it with a layer of Mexican cheese.


Step 6: Repeat steps 2-5.

Step 7: Top off your casserole with one last tortilla covered in sauce and cheese.


Step 8: Bake at 350 degrees for about 30 minutes or until the cheese on top melts.


Step 9: Slice it like a normal lasagna...it will be messy.


Step 10:  Top off with shredded lettuce, sour cream, and any other toppings you like and eat up!

Sunday, February 12, 2012

Buffalo Chicken Melts

A delicious dinner that cooks while you're at work!


Ingredients:
  • Chicken 
  • Franks RedHot Buffalo Wing Sauce
  • A pack of Hidden Valley Dry Ranch Mix
  • Water
  • Cheddar Cheese
  • Bleu Cheese Crumbles
  • Bleu Cheese Dressing
  • Bread
  • Butter
Steps:

1. Cover the bottom of your Crock-Pot with a little bit of water.  Add your chicken and cover your chicken with the Franks RedHot Buffalo Wing Sauce and the pack of Hidden Valley Dry Ranch Mix.  Then, mix these things together in the Crock-Pot, set your time, and go to work!

2.  When you get home, your chicken should be done!  Use two forks to pull apart the chicken so that it is shredded.

3.  Cover two slices of bread with butter.  Then place the chicken on one slice, some bleu cheese crumbles, and sprinkle on some cheddar cheese.  Put your melt in the oven.  Bake the melts just until the cheese starts to melt and the bread toasts a little bit.


4.  Once out of the over, put on some blue cheese dressing and top off your sandwich!


5. Demolish!


Sunday, February 5, 2012

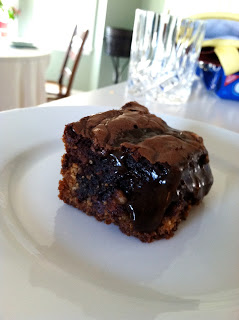
The Slutty Brownie Gone Wild

Lately, I have been working pretty hard to eat better and exercise more.  With that said, I always look forward to football Sunday's to totally splurge on calories.  Seeing how today, Super Bowl Sunday, is the Mac-Daddy of football games, I thought it was only right to make a desert that had Super Bowl calorie potential (after all this is my last football Sunday until August).  After much thought, and an undocumented amount of time scrolling through Pinterest, I came across the Slutty Brownie.  Part brownie, part chocolate chip cookie, part Oreo...it's every girls dream come true!  I just went ahead and added two more ingredients to make this Slutty Brownie go wild!


Ingredients:
Cookie Dough
Oreo Cookies
Brownie Batter
Water
Oil
Caramel Sauce
Walnuts
Crisco


Step One:
Crisco the hell out of your pan!  You don't want to have any trouble getting these delicious things out of the pan (especially since they are best served warm!).


Step 2: 

Mix together your cookie dough and add just a splash of water and oil.  This will keep the cookie part of the brownie moist since it needs to bake a little longer than usual.


Step 3:

Press the cookie dough into the bottom of your pan.


Step 4:

Place one layer of Oreo cookies on top of the cookie dough.

Step 5:

Mix together your brownie mix.  This is where I added walnuts.  


Step 6:

Pour the brownie mix on top of the chocolate chip cookie dough and Oreo cookies.


Step 7:

After smoothing the brownie mix out over everything else, I added caramel!  Just do a few straight lines of caramel and then take a knife through it (switching directions every other time).


Step 8:

Bake at 350ยบ F for 30 minutes.


Step 9:

Demolish! 


Sunday, January 22, 2012

Go Ravens!!!


If you love cupcakes and the Ravens, you're sure to love these!  I hope I didn't post this too late, because I'd love to make them again for the Superbowl and I'm sure you will too!  I made them earlier this year and just had to do it again for the Ravens v. Pats game.

They are so cute and so easy.  Sure to be a party favorite!

All you need is cupcakes (whatever flavor you want) and white icing.  I made my own icing, but I'm sure store bought would work too.  Last time I made them I dyed the icing purple, this time I accidently skipped that step, but they turned out great anyway!

Here is how you do it:
Ingredients: 


  • Cupcakes
  • White Icing
  • Red icing
  • Mini chocolate chips
  • Black licorice (Twizzlers)
  • Mini marshmallows
  • Purple sugar crystals
  • Leftover white icing
Steps:
  1. Pour the purple sugar crystals out on a plate.  After you icing your cupcakes dip them into the purple sugar crystals to cover the icing in purple.
  2. Cut the licorice into about 1" to 1.5" segments and then cut them in half long ways.  These will be the eyebrows on the raven.  You could use Twizzler pull and peels, but I feel like the normal twists have more dimension and look more like eyebrows. 
  3. Put two mini marshmallows right below the eye brows for the eyes.  The icing will hold them in place.
  4. Use the red icing as a glue to put the mini chocolate chips on the marshmallows.  Make sure you have enough red icing so that you can see it around the edges of the chocolate chips.  You gotta have those Raven red eyes!
  5. Finally, pipe the leftover white icing into a upside down triangle for the beak.
  6. Enjoy!
Last time I made these I also made Angry Bird cupcakes.  The steps are almost the same and the ingredients are just a little different:
  • Instead of purple sugar crystals, use red
  • For the beak I used Brach's Orange slices cut into small triangles
  • Skip the step with the red icing and use white to hold down the chocolate chips


This is horrible picture, but it's all I have of the first time I made them.  It's hard to see, but you can kind of tell that I dyed the icing red and purple here (but like I said, it doesn't make a difference if you cover it in sugar crystals!)

Organization Idea!

For anyone who has as many scarves as I do, you know that it's annoying trying to find places to store them.  I had them exploding out of my coat closet to the point where I couldn't shut the door.  So here is a super easy and cheap solution to the problem-Shower hooks!

All I you need is a pack of cheap shower hooks (these were about $1.95 at target) and a hanger...and voila!

So easy!


Obviously you wouldn't hang it from a door...it fits perfectly between your coats in the closet!

Busy Holidays

The holidays are always busy for everyone, and this year I don't know what happened!  One day it was Thanksgiving, the next day, Christmas.  Despite my many efforts to start a new project nothing really got off the ground because of the chaos that was decorating.  For anyone who decorates their house for Christmas, you know that that in itself is a crafters project.  I put up two trees (one real and one fake), decorated my banister, hung a line for Christmas cards, and spruced up every available area of my house with elves, candles, candy, potpourri, floral arrangements, and wreaths. 

One thing that I did get to create were gift tags for all the gifts that I wrapped.  Unfortunately, that is the only thing that came out of my craft room this season.

Here is the only picture I have of some: 


Some things that I did to create my gift tags:
  • Used left over cards from last year (usually one's with dimension to them)
  • Cuttlebugged Christmas paper 
  • Used ribbon to thread through paper and to decorate the package
  • Used my Cuttlebug to die cut letters for peoples names


Tuesday, November 22, 2011

Friendsgiving 2011

Since my birthday and my favorite holiday fall around the same time every year, I decided to host a Friendsgiving to celebrate.  I made my first stuffed turkey and the guests brought the rest!  Since most of the cooking was delegated to other people, I got to have fun decorating and making party favors.  While searching for homemade decoration ideas, I came across the Cuttlebug (a machine that does embossing and die cuts), which is one of my new favorite toys.  I used the Cuttlebug as soon as it arrived to make decorations and party favors for my Friendsgiving.  

Using another addiction, Pinterest, I found two yummy treats that I wanted to make into party.  The first favors I made were Pumpkin Pie Truffles!  These truffles were so delicious and easy to make.  Here is the recipe: Pumpkin Pie Truffles Recipe.  After making the truffles I created cute gift boxes for them to go into.  

Materials:
  • Jute Twine
  • Maroon Ribbon
  • Small brown gift boxes
  • Printable Sticker Labels
  • Fall colored card stock
  • Cuttlebug (embossing templates and leaf die cuts)
  • Candy cups (to put the truffles into: not pictured)

Gift Boxes (they come flattened and you put them together)
Jute twine, maroon ribbon, and the leaves I made using my Cuttlebug

The Final Product (truffle inside, obviously)
I forgot to take pictures of the second favor I made, but they were just as cute.  I stole the idea (from: HostessBlog), to make a Thanksgiving colored Chex Mix.  It was delicious and a big hit!  I did not package it like it is seen on the website.  Instead, I used fall colored sheer bags and kept it simple in order to accompany the cute boxes above.

Aside from favors, I did a lot of decorating.  However, I only remembered to take a picture of one thing (I'll get better at this picture taking thing...I hope).  Below is a "Be Thankful" banner that I made using my Cuttlebug.


The final thing I made (and remember to take a picture of) was deserts!  Like I said before, guests brought everything but the turkey, but I couldn't help myself when I saw these cute Pilgrim hat deserts.  They were SO easy!  

Ingredients: 
  • Reese Cups
  • Icing (yellow and orange)
  • Fudge Stripe Cookies
All I did was flip the cookies upside down, dip the Reese cup into yellow icing, and press it onto the center of the cookie until the yellow icing formed a hat rim.  To finish it off, I used orange icing to make a buckle on the hat!  And wa la!


Pilgrim Hat Cookie Treats
Overall, I think the evening was a success and I can't wait to host it again next year!